

- Getting Started
- Time Tracking
- Monitoring & Productivity
- Desktop Timer Application
- Work Management
- Time Off & Scheduling
- Administration & Settings
- Integrations
- API
- FAQ
Payrolls
Última actualización:
This guide explains how to set up payroll and run your first payroll in Trackabi.
Before You Start
To run payrolls, make sure:
- Payroll is enabled for your plan.
- You have access to payroll features (typically payroll management permissions).
- You have at least one payroll profile.
- Team members are assigned to that payroll profile.
- Team members have pay rates (see Pay & Billable Rates).
Manage Access to Payrolls
Payroll access is controlled through role permissions. To configure who can access payroll features, go to Roles, select a role, and open the Permissions tab.
Three payroll permissions are available:
- View own pay stubs – Ability for a user to view only their own pay stubs and to fill in their own bank details.
- View payrolls – Ability to view already created payrolls and their pay stubs, but cannot create or edit them.
- Manage payrolls – Full access to create, edit, and manage payroll profiles, assignments, runs, and pay stubs.
Default settings: By default, Manage payrolls and View payrolls are enabled for the account owner role only. View own pay stubs is enabled for all roles, allowing every team member to see their own pay information.
If you do not need the Payroll feature at all, disable all payroll permissions for all roles. This will remove the Payrolls menu item from the main navigation.
Step 1: Create a Payroll Profile
Go to Settings > Payroll Profiles and click Add New.
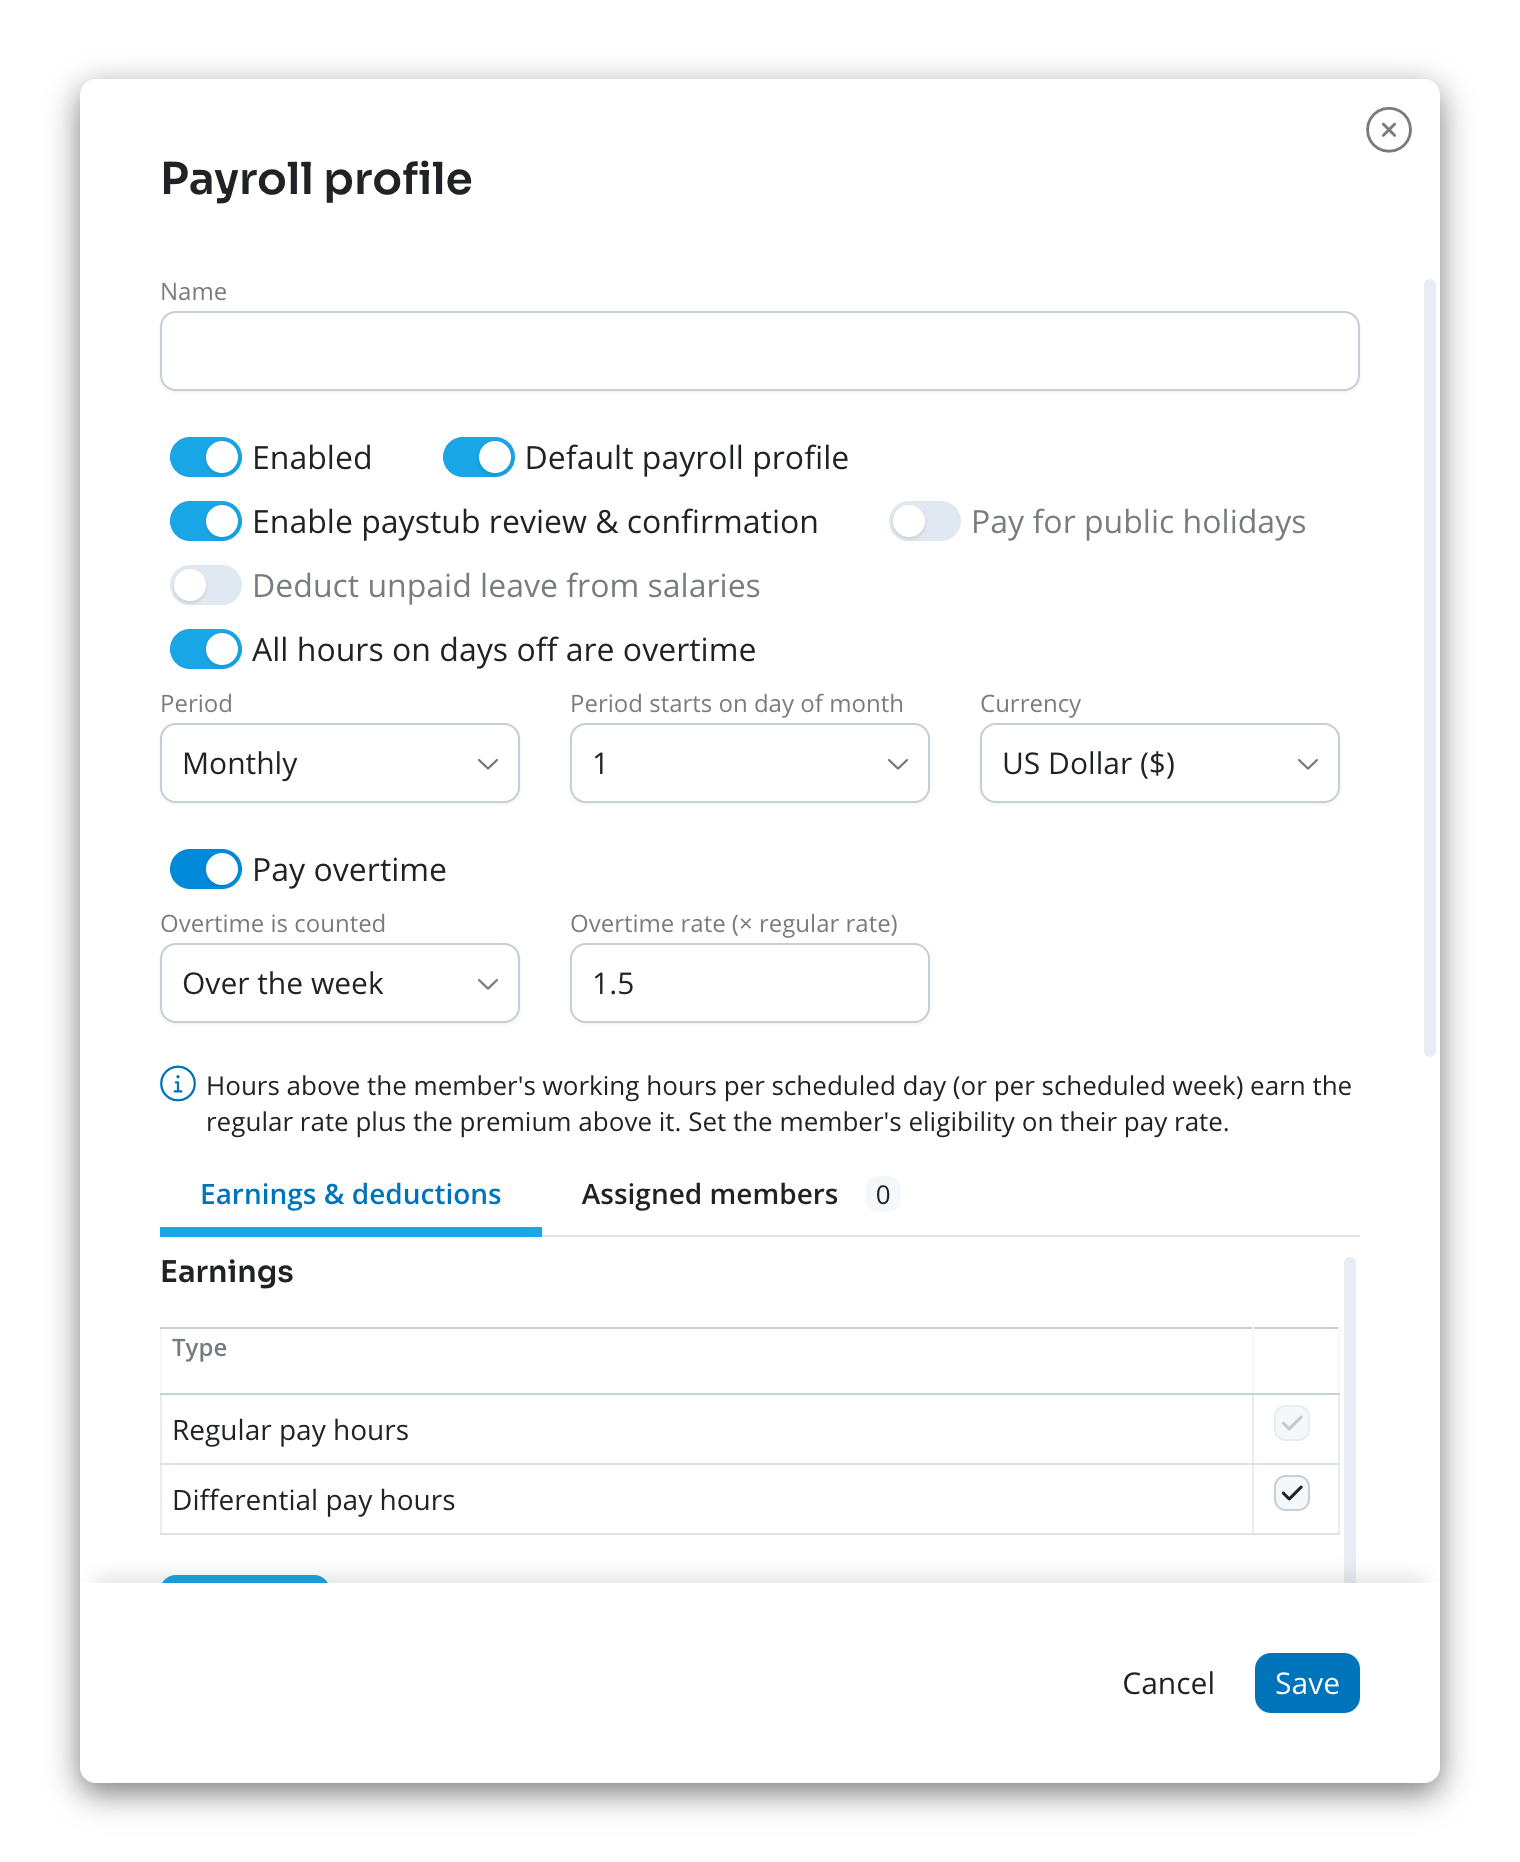
Configure the profile:
- Name: Enter a clear name (for example, US Employees).
- Enabled: Decide if this profile is active.
- Default payroll profile: Optionally mark it as default.
- Enable paystub review & confirmation: Enable if members must review and confirm their pay stubs before payment.
- Pay for public holidays: Pay members for the paid public holidays that fall on their working days (see Public Holidays). Off by default.
- Deduct unpaid leave from salaries: Lower a salaried member's pay for days of unpaid leave. See Unpaid Leave below.
- Period: Select one: Weekly, Every two weeks, or Monthly.
- Period start: Set where a pay period begins. For a weekly period, pick the weekday in Week starts on. For every two weeks, pick any date a period starts on in A period starts on; the periods run in two-week steps from it. For a monthly period, pick the day in Period starts on day of month (from 1 to 31); in shorter months the period starts on the last day of the month.
- Currency: Select the payroll currency.
- Show leave balance on pay stubs: Add a Leave section to the pay stubs of this profile. See Leave on pay stubs below. Off by default.
- Pay overtime: Pay a premium for hours above the member's standard. See Overtime below. Turning it on shows Overtime is counted (Per day or Over the week), Overtime rate (× regular rate), and All hours on days off are overtime.
Members can only be included in payrolls for this profile if their pay-rate entries are in the same currency as the profile.
You can add standard profile fields (for example, earnings fields such as bonuses, and deduction/tax fields) to structure pay stubs.
Step 2: Assign Members to a Payroll Profile
Go to Staff, click Edit next to a member, then open Payment details.
In the Payroll profiles and bank details section:
- Add a payroll profile assignment for the member. Only one payroll profile is allowed per currency.
- Select a transfer method and fill in the required bank/payment information (for example: bank name, SWIFT/BIC, IBAN, routing/account details depending on transfer type).
- Set the address used for payroll assignment: use the member profile address, or enter a custom address for this assignment.
Instead of entering the bank details yourself, you can turn on Employee fills in bank details. The profile is then assigned without bank details, shows Awaiting bank details, and the employee is asked by email and push notification to fill them in.
Team members with the View own pay stubs permission manage their own bank details in their personal Settings > Payment details. They see one set of details for each payroll profile assigned to them, cannot change the profile itself, and their managers are notified when they change the details. The bank details are printed on pay stubs.
A member must have a matching assignment for the selected payroll profile to be included in payroll runs for that profile.
If a member does not have a personal pay rate set in their profile, payroll may use a fallback rate from a default company rate, client rate, or project rate.
In fallback-rate scenarios, currencies can differ. If the effective rate currency does not match the currency of the assigned payroll profile, that member's tracked time is not added to payroll for that profile.
Recurring rows
Rows that belong on every pay stub of a member, such as a pension deduction or a fixed allowance, can be added once instead of on every stub. In the member's Payment details, the Recurring rows column of a payroll profile shows how many the member has; click it to edit them. Each row has:
- Section — Earnings, Deductions before tax, Tax or Deductions after tax.
- Profile field — A field of that section in the payroll profile, whose row the amount fills, or Own row for a row of its own with its own Name.
- Amount — Always in the currency of the payroll profile.
- Until (optional) — A pay period starting after this date no longer gets the row.
- Stop after (optional) — The number of pay stubs to add the row to; empty means No limit. Whichever of the two limits comes first ends the row.
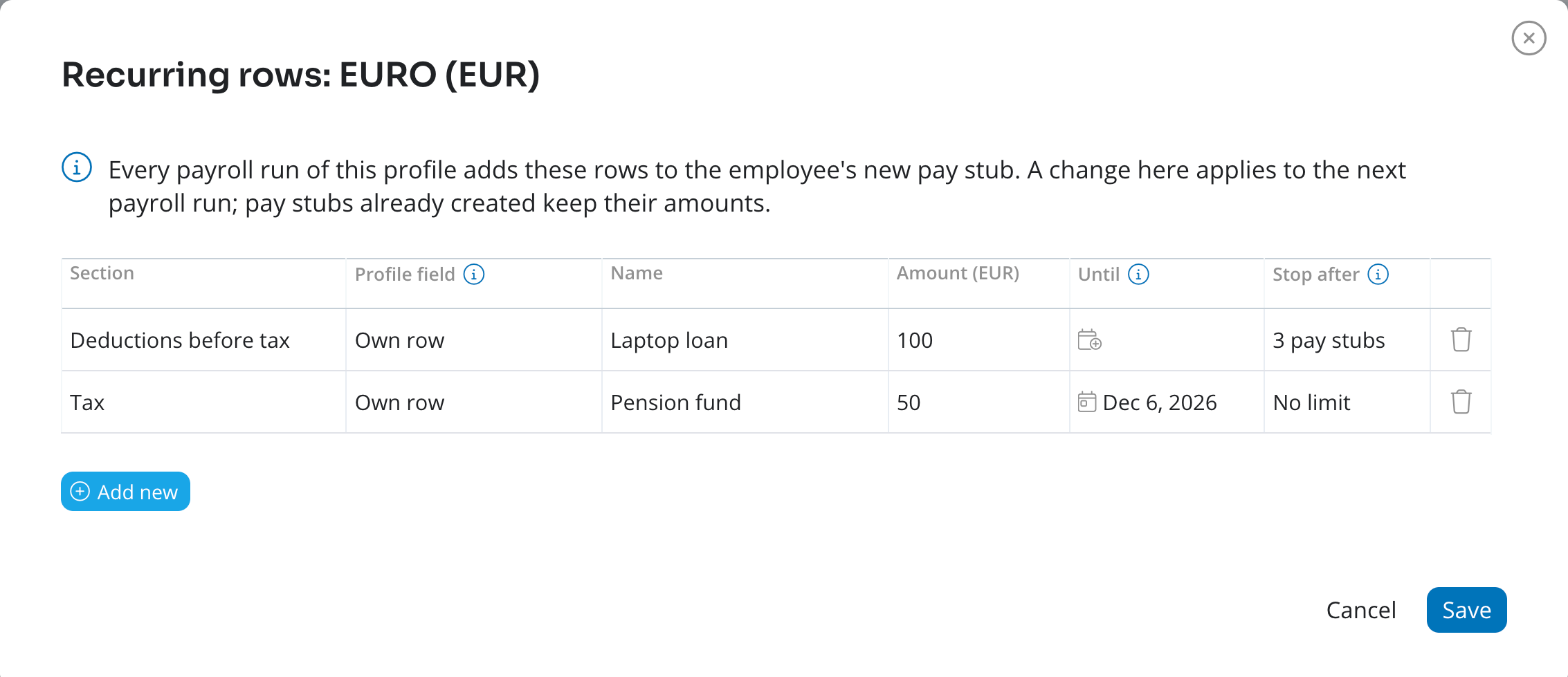
A section holds up to 10 recurring rows, and a profile field can have only one. Managing recurring rows needs the Manage payrolls permission.
Every payroll run of the profile copies the rows onto the member's new pay stub, and in the run's review step an icon next to the member lists them. The pay stub keeps its own copy: editing a recurring row changes only the next runs, never a pay stub already issued, and changing the amount on a pay stub changes only that pay stub. A pay stub of a payroll that is deleted and run again does not use up a Stop after period.
Step 3: Run Payroll
Go to Payrolls and click Run Payroll.
Step 3.1 Select Payroll Settings
Choose:
- Payroll profile
- Pay period
- Planned pay date
Pay-date behavior: The system suggests a default pay date based on organization working days and holidays.
Pay-date behavior: You can override this date manually.
Click Proceed.
Step 3.2 Review Payroll Draft
The system creates a payroll draft preview with pay stubs for eligible members.
You can review and adjust:
- Pay rates and hours.
- Earnings, deductions, and taxes.
- Additional values (for example, bonus adjustments).
- Notes in a pay stub.
- Included/excluded members (remove a member from this run by unselecting them).
If a person does not have a personal pay rate, their paid time off is not calculated.
Time off is included in pay stubs only when the leave type used is marked as Paid. This can be configured in Settings > Schedules > Leave types.
When everything is correct, click Run payroll.
How Pay Is Calculated
Hourly Rates
A member on an hourly rate is paid for the hours they logged in the period at the rate in force on each date. Paid time off and paid public holidays are priced at the member's hours per day × their hourly rate, and paid breaks are paid for the break time logged.
Salaries
A member whose pay rate is a daily, weekly, or monthly salary (see Pay & Billable Rates) is paid the salary for the period, not the hours they logged. The salary is converted to the profile's period:
- A daily salary pays the amount for each scheduled working day of the period.
- A weekly salary pays the weekly amount per week (twice that for every two weeks, or × 52 ÷ 12 for a monthly period).
- A monthly salary pays the monthly amount for a monthly period, or × 12 ÷ 52 per week for a weekly period (twice that for every two weeks).
Each scheduled working day of the period earns an equal share of the salary. When a salary starts, ends, or changes during the period, each day is paid from the pay rate in force on it, and days paid at an hourly rate are paid for their hours as usual.
The member's logged hours, paid time off, public holidays, and breaks are already covered by the salary. They are shown on the pay stub for information as Hours included in salary, with no amount. A daily salary is the exception: it pays only scheduled working days, so its paid public holidays are paid separately on the Public holidays line.
Time logged with a time type that has a wage coefficient above one adds only the premium on top of the salary: hours × hourly rate × (coefficient − 1).
The salary applies only when the salary's currency matches the payroll profile's currency.
Overtime
When Pay overtime is on in the payroll profile, hours above a member's standard earn a premium on top of their regular pay:
overtime hours × regular rate × (overtime rate − 1)
For example, with an overtime rate of 1.5, each overtime hour earns half of the regular rate extra. The straight-time part of these hours is already paid by the hours lines or the salary.
- Per day: overtime is the time above the member's hours per day on each scheduled working day.
- Over the week: overtime is the time above the member's scheduled hours for the week. Weeks follow the organization's first day of the week (Settings > General Settings). A week that spans two pay periods is paid in the period that holds its last day, so it is paid once.
- All hours on days off are overtime: when on, every hour worked on a day off (a weekend or a public holiday) is overtime. When off, hours on days off are not counted toward overtime at all. On by default.
- The regular rate is the member's straight-time earnings for the day or week divided by the hours worked, so hours logged with a higher-paid time type raise it.
- Only members whose pay rate has Overtime on are paid overtime. It is on by default for hourly rates and off for salaries.
- Break time does not count as work.
Some time types already pay more than the regular rate. Hours logged with them count toward overtime too, so they may also receive the overtime premium.
Unpaid Leave
When Deduct unpaid leave from salaries is on, each day of unpaid leave lowers a salaried member's gross pay by the member's hours per day × their hourly rate. It is shown as a negative Unpaid leave line among the earnings. The deduction is never larger than the salary, and a period spent entirely on unpaid leave deducts the whole salary. Members on an hourly rate are not affected: they are paid only for the hours they log.
Pay Stub Lines
Depending on the member and the profile, the earnings of a pay stub can include Salary, Hours included in salary, Regular pay hours, differential hours, Paid time off, Public holidays, Breaks, Overtime premium, and Unpaid leave. A line appears only when it applies.
Changes to pay rates or payroll profiles do not recalculate payrolls that have already been run.
Step 4: Confirmation and Payment
After running payroll:
- If the Enable paystub review & confirmation option is enabled in the payroll profile, the payroll moves into the Awaiting confirmation state.
- Each member receives an email asking them to review their pay stub and confirm the data is correct.
- Once all pay stubs belonging to the same payroll are confirmed, the payroll moves to the Ready to pay state. At this point, a manager can mark the payroll as paid.
- If the Enable paystub review & confirmation option is disabled, the payroll and all its pay stubs move directly to the Ready to pay state as soon as payroll is run.
- After marking as paid, it is no longer possible to edit anything in the payroll or its pay stubs.
A manager can mark payroll as paid even if some pay stubs have not yet been confirmed by their payees.
Step 5: Mark Payroll as Paid
Once the confirmation process is complete, or if confirmation was not required, and you have made the payment through your bank, you can mark the payroll as paid in Trackabi.
To do this, open the payroll and click the Mark as paid button. You can select any payment date or leave the default date. This finalizes the payroll and locks all pay stubs from further editing.
What You Can Edit Later
Before payroll is paid, authorized users can typically:
- Open payroll details.
- View individual pay stubs (can also be exported to PDF or printed).
- Edit pay stubs as needed.
- Update payroll pay date when marking as paid.
Once a payroll is marked as paid, it is treated as finalized and editing options are limited.
Pay Stubs
After payroll has been run, each included team member can view their pay stub in their private area. A pay stub contains information about earned wage or salary, paid time off, overtime, bonuses, deductions, taxes, other fields configured in the payroll profile, and the bank details the pay is sent to.
If the payroll profile has Enable paystub review & confirmation enabled, members will receive an email notification when a new pay stub is available. They can review the details and confirm that everything is correct directly from their private area.
Pay stubs can be exported to PDF or printed at any time.
Recurring rows on a pay stub
When editing a pay stub, rows copied from the member's recurring rows carry a mark. Any other row with a name can be turned into a recurring row with Make recurring, which adds it to every next pay stub of this profile. Under the rows, the pay stub also suggests the non-zero rows of the member's previous pay stub under the same profile that this one does not have yet, with Add and Add all; nothing is added until you click.
Leave on pay stubs
With Show leave balance on pay stubs on in the payroll profile, each pay stub gets a Leave section: the days of leave taken per leave type in this period and year to date, then the Allowance for the year, the days Used and the days Remaining at the end of the period. Leave types marked * count against the allowance, and only they make up Used.
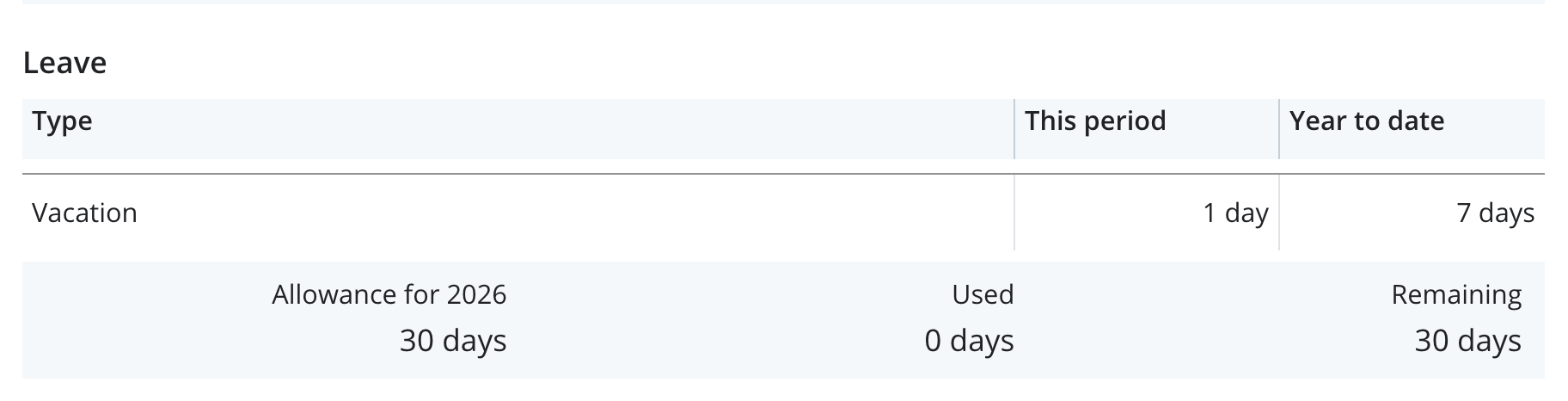
- Only approved leave counts, and only up to the end of the period.
- Days are working days of the member's work schedule; public holidays and days off are not counted, and a half day counts as 0.5.
- The allowance is the member's own annual allowance, or else the company's, prorated for the part of the year the member was employed. See Planning Leaves.
The section is calculated when the payroll is run and stays as it was: leave approved later and edits of the pay stub do not change it. Payrolls run before the switch was turned on have no Leave section.