

- Getting Started
- Time Tracking
- Monitoring & Productivity
- Desktop Timer Application
- Work Management
- Time Off & Scheduling
- Reports & Finance
- Integrations
- API
- FAQ
Timesheet Settings (Time Log Fields)
Última actualización:
Settings > Time tracking > Timesheet fields manages the data fields (columns) of the timesheet: enable or disable the default fields, add or remove custom ones, and arrange how the fields are laid out in the time entry form of each app.
What each column of the builder does
Every row is one timesheet column. Default columns can be renamed, hidden, or made mandatory; custom fields can also be typed and deleted.

- Enabled — Shows the column in timesheets and in time entry forms. Disabling a column hides it; its data stays until the field is deleted.
- Mandatory — Requires a value before a time entry can be saved. The check runs when an entry is saved or a running timer is stopped; starting a timer does not require it. Time entry forms mark a mandatory field with an asterisk after its label.
- Managers only — Restricts the field to the company timesheet. Employees never see it in their personal timesheet or in their own entry forms, so it works for notes managers keep about an entry. Ticking it sets Visibility in timesheet to Company and locks it.
- Visibility in timesheet — Sets whether the column appears in the personal timesheet, the company timesheet, or Both. It affects only the timesheet table — the field is always present in an entry's edit and view forms.
- Field name / alias — Sets the column heading. A default column shows its original name as a hint and can be renamed; a custom field needs a name. Up to 100 characters.
- Expected data type — Sets the kind of value a custom field accepts. Default columns show Default type and cannot be changed.
Drag the handle at the end of a row to change the column order in the timesheet table. Where the fields sit in the time entry form is set separately, with Customize form layout (below).
Arrange the time entry form
Customize form layout, at the top of the Timesheet fields page next to Save, sets the order of the fields in the time entry form and which of them share a row. The layout applies to the whole organization. It has four tabs, one per form:
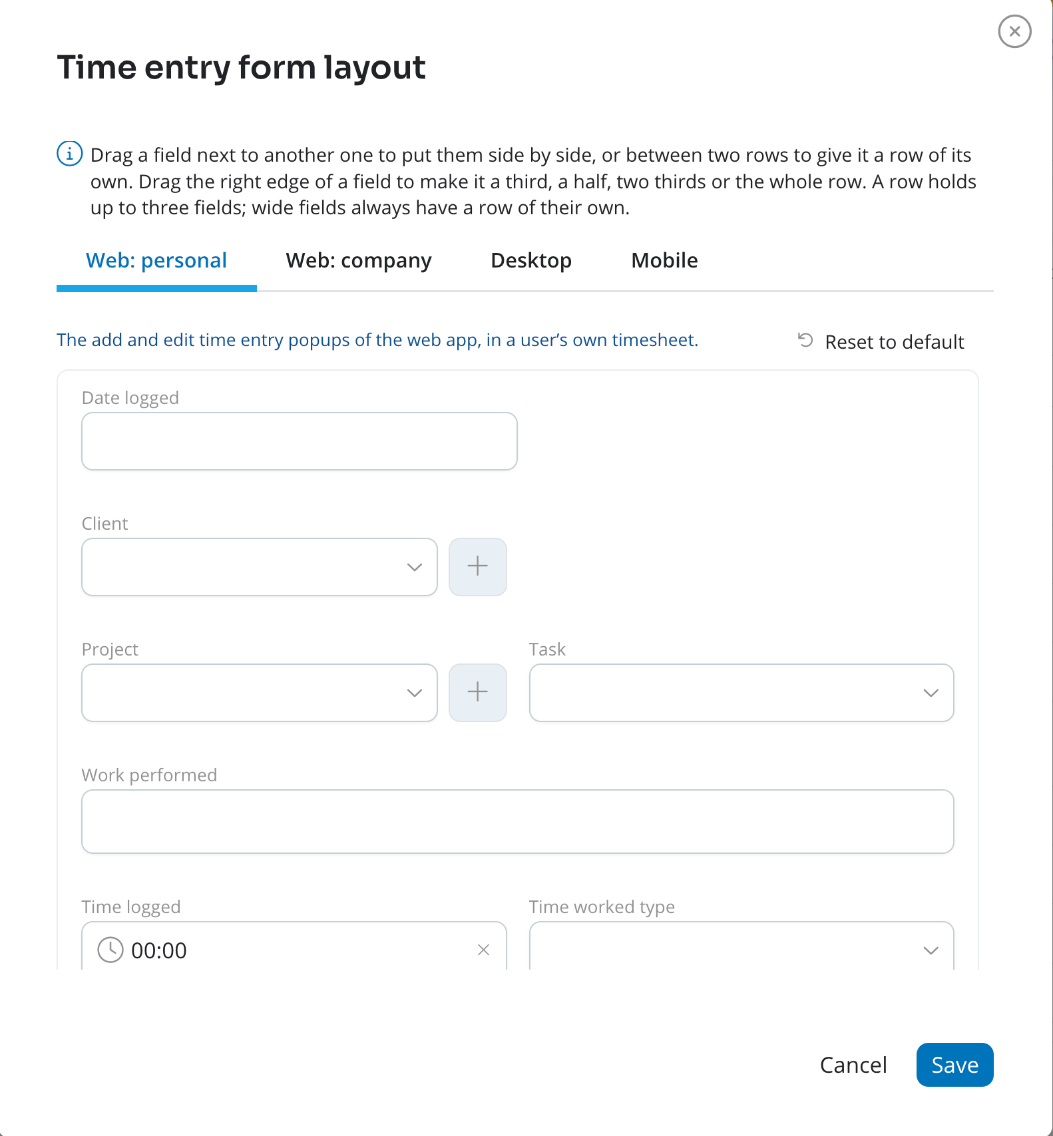
- Web: personal — The add and edit time entry popups in a user's own timesheet.
- Web: company — The same popups in the company timesheet, where the user is picked too.
- Desktop — The time entry form of the Desktop app, version 2.2.4 and later. Its first two rows are the grey timer block, and the timer always stays first.
- Mobile — The time entry form of the mobile app. The timer, start, end and time type stay in the card above the map and are not placed by the layout.
Each tab shows the form as it looks in that app. Drag a field next to another one to put them side by side, or between two rows to give it a row of its own. Drag the right edge of a field to make it a third, a half, two thirds or the whole row. A row holds up to three fields. Work performed, Attachments and Big Text fields are wide and always take a row of their own.
Only the fields a form actually shows can be placed: managers-only fields are absent from the personal and app forms, company-only columns from the personal form, and Client while Project is mandatory. Date logged is not part of the layout.
Reset to default returns the open tab to the app's standard arrangement. A form whose tab has never been saved keeps that standard arrangement, with custom fields following on rows of their own.
The layout is arranged for the fields in the table, so saving it also saves any unsaved changes to the timesheet fields. If those cannot be saved, the layout is not saved either.
Custom fields and their limits
A custom field is one of five types: Text (255 characters max), Big Text for longer notes, Integer Number, Decimal Number, or Boolean, which shows as a checkbox. The number of fields of each type is capped — 15 Text, 5 Big Text, 10 Integer, 5 Decimal, and 5 Boolean — so a timesheet can carry up to 40 custom fields. When a type is used up, choosing it again shows Sorry, but you've reached the maximum number of fields of this type available.

Deleting a custom field deletes every value stored in that column. The confirmation dialog says so; there is no undo.
Columns with fixed settings
A few rows cannot be changed freely, because the timesheet depends on them:
- Member — Always enabled, mandatory, managers only, and visible in the company timesheet only — it identifies whose entry it is.
- Date logged — Always enabled and mandatory.
- Time types — Always mandatory and visible in both timesheets. It can be disabled if your company does not use time types.
- Attachments — Never mandatory and never managers only. Enabling it adds an upload block to entry forms — see File Attachments.
- Wage and Billable amount — Read-only, calculated columns. Who can see them is decided by the View pay rates and wages and View billable rates and amounts role permissions, not here, and they always sit right after Time logged and Billable time. They cannot be reordered or deleted.
Two dependencies show up in the entry form rather than in this table: the Client field is shown only while Project is not mandatory, and Billable time is shown only when the entry's time type is billable.